Newsletter
Turn your blog posts into newsletters. Your readers can subscribe, and you can send them updates when you publish new content.
Activating the newsletter
Go to Settings → Newsletter to enable or disable the newsletter feature for your blog.
When enabled, a subscription form will appear on your blog, allowing visitors to subscribe.
When disabled, the subscription form is hidden and newsletter features are unavailable.
Managing subscribers
Once the newsletter is enabled, you can access the Subscribers page from your dashboard.
Here you'll see:
- The full list of subscribers
- Subscription dates
- Subscriber status
Use this page to monitor your audience growth and manage your subscriber list.
Imported subscribers under review
When you import a list, the new subscribers are placed under review. Mailbox providers judge a sender by how readers react to its emails, and a list they have never seen from us is a risk for your sender reputation, even when everyone on it signed up.
While a list is under review, your newsletters don't reach all of it at once. Each newsletter goes to your existing subscribers and to part of the imported ones. As soon as an imported subscriber opens one of your emails, they receive every newsletter from then on.
The rest of the list is opened up gradually, as your readers open your newsletters. If they barely open them, sending to the rest of the list slows down, so that a list that doesn't engage doesn't harm your reputation. The Subscribers page shows how many subscribers are still under review.
Open tracking is turned on when you import a list, because the review relies on it. If you turn it off, the subscribers still under review are no longer added to your newsletters.
Paying subscribers are never placed under review.
Welcoming new subscribers
A reader is never more interested in you than in the minute they confirm their subscription. Then comes the wait for your next post, which can be weeks, and by then they have forgotten who you are.
Turn on Welcome email in Settings → Newsletter to close that gap. Write a subject and a message once, and every reader who confirms receives it right away.
Write it in the same editor you use for your posts. Your blog name, the footer and the unsubscribe link are added for you.
A good welcome email says who you are, what you write about, and how often to expect you. It does not need to be long.
Every subscriber gets it exactly once, whichever way they signed up: through the form on your blog, or by clicking Subscribe while signed in to Writizzy. Readers whose email address has not been confirmed yet get it the moment they confirm.
Subscribers you import from another platform are not emailed, on purpose. Sending a whole imported list a greeting at once is the fastest way to collect spam complaints.
This feature is available from the Starter plan.
Sending newsletters
When you publish a post, you have three options:
Send now: The post goes live and is emailed to your subscribers right away.
Don't send: The post goes live without an email. Perfect for content you don't want to email out.
Schedule: Pick a date and time, in the timezone of your choice. The post stays hidden until then, and goes live with its newsletter and your cross-posts at that moment.
How it works
Every time you publish a post, you decide if it should be sent to your subscribers.
This gives you full control over what ends up in your readers' inboxes. Not every post needs to be a newsletter. You choose.
Already published a post without emailing it? Open it and send the newsletter from the post settings, right away or at a time you pick.
Paid-only newsletters
If you have paid subscriptions enabled, you can restrict a newsletter to paying subscribers only.
When publishing a post, set its access to Paid. Writizzy will automatically send that newsletter only to your paying members. Free subscribers won't receive it.
Posts set to Free are sent to all subscribers, regardless of their tier.
This lets you offer a two-tier newsletter: public updates for everyone, and deeper content reserved for paying readers.
Recommending other newsletters
Once a reader subscribes to you, you can offer them other Writizzy blogs to subscribe to as well, and get recommended back by the creators you point to. See Recommendations.
Email delivery
By default, Writizzy sends your newsletters through its own infrastructure. No configuration needed, newsletters go out as soon as you publish or at the scheduled time you set.

Your sender address
Each blog sends from its own address, based on your subdomain. A blog named something sends from something@writizzy.com. You can see the exact address in Settings → Newsletter.
Letting readers reply
By default your newsletters do not accept replies. Someone who hits Reply will not reach you.
Turn on Let readers reply in Settings → Newsletter to change that. Replies then go to your account address, or to any other address you enter.
The address you choose is visible to every subscriber. If you would rather not publish your personal mailbox, enter a dedicated one.
Connect your own SMTP provider
If your plan allows it, you can connect your own SMTP provider and send newsletters through it instead. This is useful if you already have a transactional email account with Mailgun, Resend, Postmark, SendGrid, Brevo, or a similar provider.
Go to Settings → Newsletter → Email delivery and click Connect your own SMTP.
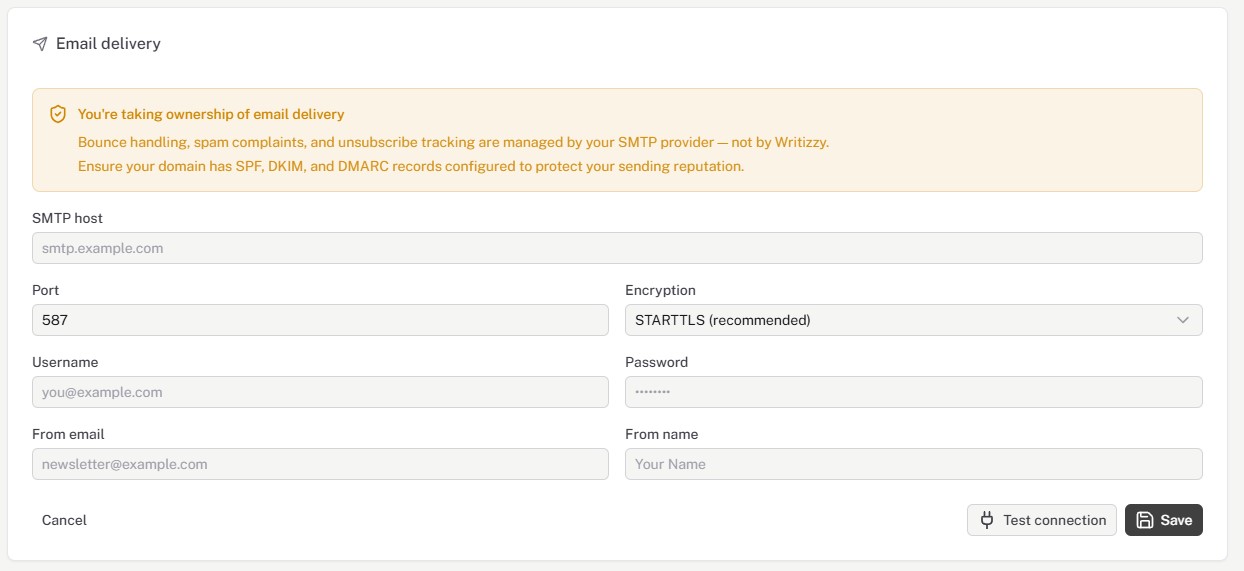
Fill in the following fields:
- SMTP host — the hostname of your SMTP server (e.g.
smtp.mailgun.org) - Port — typically
587for STARTTLS or465for SSL/TLS - Encryption — STARTTLS is recommended; use SSL/TLS if your provider requires it
- Username — your SMTP account username or API key (varies by provider)
- Password — your SMTP password or secret key (password is encrypted and stored securely)
- From email — the address your newsletters will be sent from (e.g.
hello@yourdomain.com) - From name — the display name subscribers will see (e.g. your blog name)
Click Test connection before saving. Writizzy will send a test email to your account address to confirm the settings work.
You become responsible for deliverability. When using your own SMTP, Writizzy no longer handles bounces, spam complaints, or delivery issues. Before sending, make sure your sending domain has SPF, DKIM, and DMARC DNS records configured correctly. Your SMTP provider will have instructions for this.
Do not use Gmail SMTP for newsletters. Gmail limits outgoing email to 100–500 messages per day and is not intended for bulk sending. Use a dedicated transactional email provider for anything beyond a handful of subscribers.
Delivery stats are limited with BYOS. Delivery status (delivered/failed) is based on SMTP return codes, not Writizzy's tracking infrastructure. You will not get the same delivery analytics as with Writizzy's default setup.
Removing your SMTP configuration
If your plan does not require BYOS, you can remove your SMTP configuration at any time from Settings → Newsletter → Email delivery. Writizzy will resume sending newsletters through its own infrastructure, and your plan's subscriber limits will apply.
If you run into issues or have questions, reach out at /contact.